m (recipe template) Tags: B32 sourceedit |
mNo edit summary Tags: Visual edit B35 |
||
| (8 intermediate revisions by 5 users not shown) | |||
| Line 1: | Line 1: | ||
'''Hammers''', also known as warhammers or bludgeons after the names of most hammer types, are a [[Weapon Types|type of weapon]]. These weapons are sometimes used by NPCs in combat. |
'''Hammers''', also known as warhammers or bludgeons after the names of most hammer types, are a [[Weapon Types|type of weapon]]. These weapons are sometimes used by NPCs in combat. |
||
| − | Hammers deal 3 more then their equipment set's base damage, have the same durability as their corresponding [[ |
+ | Hammers deal 3 more then their equipment set's base damage, have the same durability as their corresponding [[sword]]s, and will do greater knockback. However, the player cannot block while wielding a hammer. All warhammers (including the blacksmith hammer) have speed of 65%, reach of 100% and knockback of +1. |
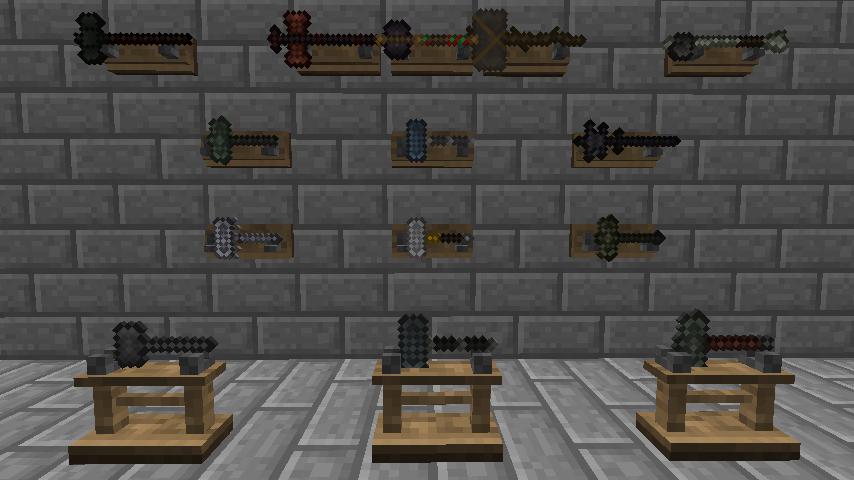
[[File:Hammers.png|thumb|500px|center|All the hammers of {{update|26}} on [[Weapon Rack|weapon racks]].]] |
[[File:Hammers.png|thumb|500px|center|All the hammers of {{update|26}} on [[Weapon Rack|weapon racks]].]] |
||
== Crafting == |
== Crafting == |
||
| − | Most hammers are crafted with three [[stick]]s and four [[:Category:Ingots|ingots]]. The type of ingot and type of |
+ | Most hammers are crafted with three [[stick]]s and four [[:Category:Ingots|ingots]]. The type of ingot and type of {{CT|C}} required depends on the hammer. Usually, these will correspond with the faction that wields the hammer. For example, in the recipes below, a Dwarven warhammer requires [[Dwarven Steel Ingot|Dwarven steel ingots]] on a {{CT|Dwarven}}, while an Orc warhammer requires [[Orc Steel Ingot|Orc steel ingots]] on a {{CT|Morgul}}. The list in the section below denotes the required ingots and crafting table for each type of hammer. |
== List of Hammers == |
== List of Hammers == |
||
| − | Below are listed all the hammers as of {{update| |
+ | Below are listed all the hammers as of {{update|33.4}}. Information is also provided on its attack damage (sorted increasingly), durability (sorted increasingly), on the type of ingot that is required and its respective crafting table. When you compare the hammer to the corresponding [[sword]], you'll notice, that it deals {{bar|hearts|3}} more damage, but the durability is the same as that of the sword: |
| − | {| |
+ | {| class="article-table mw-collapsible mw-collapsed" style="width: 100%;" border="1" |
| − | + | ! colspan="2" |'''{{PAGENAME}} Crafting Recipes and Damage''' |
|
|- |
|- |
||
| − | !Hammer |
||
!Crafting Recipe |
!Crafting Recipe |
||
| − | !Material |
||
!style="width: 10em;"|Damage |
!style="width: 10em;"|Damage |
||
|- |
|- |
||
| + | |{{Recipe|{{PAGENAME}}|dunlending}} |
||
| − | |[[Dunlending Equipment|Dunlending club]] |
||
| − | |{{Grid/Crafting Table |
||
| − | |Output= Dunlending Equipment |
||
| − | |Output-image = dunlendingClub.png |
||
| − | |CTM = Dunlending |
||
| − | |B1 = Wood Planks |
||
| − | |B1-image = Planks.gif |
||
| − | |B2 = Wood Planks |
||
| − | |B2-image = Planks.gif |
||
| − | |B3 = Wood Planks |
||
| − | |B3-image = Planks.gif |
||
| − | }} |
||
| − | |wood planks |
||
|{{bar|hearts|4|size=infobox}} |
|{{bar|hearts|4|size=infobox}} |
||
|- |
|- |
||
| + | |{{Recipe|{{PAGENAME}}|morwaith}} |
||
| − | |[[Moredain Equipment|Moredain club]] |
||
| − | |{{Grid/Crafting Table |
||
| − | |Output = Moredain Equipment |
||
| − | |Output-image = clubMoredain.png |
||
| − | |CTM = Moredain |
||
| − | |B1 = Wood Planks |
||
| − | |B1-image = Planks.gif |
||
| − | |B2 = Wood Planks |
||
| − | |B2-image = Planks.gif |
||
| − | |B3 = Wood Planks |
||
| − | |B3-image = Planks.gif |
||
| − | }} |
||
| − | |wood planks |
||
|{{bar|hearts|9|size=infobox}} |
|{{bar|hearts|9|size=infobox}} |
||
|- |
|- |
||
| + | |{{Recipe|{{PAGENAME}}|half-troll}} |
||
| − | |[[Half-troll Equipment|Half-troll warhammer]] |
||
| − | |{{Grid/Crafting Table |
||
| − | |Output= Half-troll Equipment |
||
| − | |Output-image = HammerHalfTroll.png |
||
| − | |CTM = Half-troll |
||
| − | |Row1 = Cobblestone |
||
| − | |Row2 = Cobblestone |
||
| − | |B1 = Stick |
||
| − | |B2 = Stick |
||
| − | |B3 = Stick |
||
| − | }} |
||
| − | |{{VanillaLink|cobblestone}} |
||
|{{bar|hearts|9.5|size=infobox}} |
|{{bar|hearts|9.5|size=infobox}} |
||
|- |
|- |
||
| + | |{{Recipe|{{PAGENAME}}|taurethrim}} |
||
| − | |[[Tauredain Equipment|Tauredain bludgeon]] |
||
| − | |{{Grid/Crafting Table |
||
| − | |Output = Tauredain Equipment |
||
| − | |Output-image = HammerTauredain.png |
||
| − | |CTM = Tauredain |
||
| − | |Row1 = Obsidian Shard |
||
| − | |Row1-image = ObsidianShard.png |
||
| − | |Row2 = Obsidian Shard |
||
| − | |Row2-image = ObsidianShard.png |
||
| − | |B1 = Stick|B1-image=Stick.png |
||
| − | |B2 = Stick|B2-image=Stick.png |
||
| − | |B3 = Stick |
||
| − | }} |
||
| − | |[[Obsidian Shard|Obsidian shards]] |
||
|{{bar|hearts|9.5|size=infobox}} |
|{{bar|hearts|9.5|size=infobox}} |
||
|- |
|- |
||
| ⚫ | |||
| − | |[[Angmar Equipment|Angmar warhammer]] |
||
| ⚫ | |||
| − | |[[Orc Steel Ingot|Orc steel ingots]] |
||
|{{bar|hearts|9.5|size=infobox}} |
|{{bar|hearts|9.5|size=infobox}} |
||
|- |
|- |
||
| + | |{{Recipe|{{PAGENAME}}|dol guldur}} |
||
| − | |[[Dol Guldur Equipment|Dol Guldur warhammer]] |
||
| − | |{{Grid/Crafting Table |
||
| − | |Output = Dol Guldur Equipment |
||
| − | |Output-image = HammerDolGuldur.png |
||
| − | |CTM = Dol Guldur |
||
| − | |Row1 = Orc Steel Ingot |
||
| − | |Row1-image = OrcSteel.png |
||
| − | |Row2 = Orc Steel Ingot |
||
| − | |Row2-image = OrcSteel.png |
||
| − | |B1 = Stick|B1-image=Stick.png |
||
| − | |B2 = Stick|B2-image=Stick.png |
||
| − | |B3 = Stick |
||
| − | }} |
||
| − | |[[Orc Steel Ingot|Orc steel ingots]] |
||
|{{bar|hearts|9.5|size=infobox}} |
|{{bar|hearts|9.5|size=infobox}} |
||
|- |
|- |
||
| + | |{{Recipe|{{PAGENAME}}|mordor}} |
||
| − | |[[Mordor Equipment|Mordor warhammer]] |
||
| − | |{{Grid/Crafting Table |
||
| − | |Output = Mordor Equipment |
||
| − | |Output-image = HammerOrc.png |
||
| − | |CTM = Morgul |
||
| − | |Row1 = Orc Steel Ingot |
||
| − | |Row1-image = OrcSteel.png |
||
| − | |Row2 = Orc Steel Ingot |
||
| − | |Row2-image = OrcSteel.png |
||
| − | |B1 = Stick|B1-image=Stick.png |
||
| − | |B2 = Stick|B2-image=Stick.png |
||
| − | |B3 = Stick |
||
| − | }} |
||
| − | |[[Orc Steel Ingot|Orc steel ingots]] |
||
|{{bar|hearts|9.5|size=infobox}} |
|{{bar|hearts|9.5|size=infobox}} |
||
|- |
|- |
||
| + | |{{Recipe|{{PAGENAME}}|gondorian}} |
||
| − | |[[Gondorian Equipment|Gondorian warhammer]] |
||
| − | |{{Grid/Crafting Table |
||
| − | |Output = Gondorian Equipment |
||
| − | |Output-image = GondorianWarhammer.png |
||
| − | |CTM = Gondorian |
||
| − | |Row1 = Iron Ingot |
||
| − | |Row2 = Iron Ingot |
||
| − | |B1 = Stick |
||
| − | |B2 = Stick |
||
| − | |B3 = Stick |
||
| − | }} |
||
| − | |[[Iron Ingot|iron ingots]] |
||
|{{bar|hearts|9.5|size=infobox}} |
|{{bar|hearts|9.5|size=infobox}} |
||
|- |
|- |
||
| + | |Blacksmith Hammer[[File:BlacksmithHammer.png|32px]] can not be crafted, but only obtained by [[trading]] with human or dwarven smiths or as a loot drop from of these NPCs. |
||
| − | |[[:category:Blacksmith|Blacksmith hammer]] |
||
| − | |Can not be crafted, but only obtained from [[:category:Blacksmith|blacksmiths]]. |
||
| − | |Can not be crafted. |
||
|{{bar|hearts|9.5|size=infobox}} |
|{{bar|hearts|9.5|size=infobox}} |
||
|- |
|- |
||
| + | |{{Recipe|{{PAGENAME}}|uruk}} |
||
| − | |[[Uruk Equipment|Uruk warhammer]] |
||
| − | |{{Grid/Crafting Table |
||
| − | |Output= Uruk Equipment |
||
| − | |Output-image = HammerUruk.png |
||
| − | |CTM = Uruk |
||
| − | |Row1 = Uruk Steel Ingot |
||
| − | |Row1-image = UrukSteel.png |
||
| − | |Row2 = Uruk Steel Ingot |
||
| − | |Row2-image = UrukSteel.png |
||
| − | |B1 = Stick|B1-image=Stick.png |
||
| − | |B2 = Stick|B2-image=Stick.png |
||
| − | |B3 = Stick |
||
| − | }} |
||
| − | |[[Uruk Steel Ingot|Uruk steel ingots]] |
||
|{{bar|hearts|10|size=infobox}} |
|{{bar|hearts|10|size=infobox}} |
||
|- |
|- |
||
| + | |{{Recipe|{{PAGENAME}}|dwarven}} |
||
| − | |[[Dwarven Equipment|Dwarven warhammer]] |
||
| − | |{{Grid/Crafting Table |
||
| − | |Output= Dwarven Equipment |
||
| − | |Output-image = HammerDwarven.png |
||
| − | |CTM = Dwarven |
||
| − | |Row1 = Dwarven Steel Ingot |
||
| − | |Row2 = Dwarven Steel Ingot |
||
| − | |B1 = Stick |
||
| − | |B2 = Stick |
||
| − | |B3 = Stick |
||
| − | }} |
||
| − | |[[Dwarven Steel Ingot|Dwarven steel ingots]] |
||
|{{bar|hearts|10|size=infobox}} |
|{{bar|hearts|10|size=infobox}} |
||
|- |
|- |
||
| + | |{{Recipe|{{PAGENAME}}|blue dwarven}} |
||
| − | |[[Blue Dwarven Equipment|Blue Dwarven warhammer]] |
||
| − | | |
||
| − | {{Grid/Crafting Table |
||
| − | |Output= Blue Dwarven Equipment |
||
| − | |Output-image = HammerBlueDwarven.png |
||
| − | |CTM = Blue Mountains |
||
| − | |Row1 = Blue Dwarven Steel Ingot |
||
| − | |Row1-image = Blue Dwarven Steel.png |
||
| − | |Row2 = Blue Dwarven Steel Ingot |
||
| − | |Row2-image = Blue Dwarven Steel.png |
||
| − | |B1 = Stick|B1-image = Stick.png |
||
| − | |B2 = Stick|B2-image = Stick.png |
||
| − | |B3 = Stick |
||
| − | }} |
||
| − | |[[Blue Dwarven Steel Ingot|Blue Dwarven steel ingots]] |
||
|{{bar|hearts|10|size=infobox}} |
|{{bar|hearts|10|size=infobox}} |
||
|- |
|- |
||
| + | |{{Recipe|{{PAGENAME}}|black uruk}} |
||
| − | |[[Black Uruk Equipment|Black Uruk warhammer]] |
||
| − | |{{Grid/Crafting Table |
||
| − | |Output = Black Uruk Equipment |
||
| − | |Output-image = HammerBlackUruk.png |
||
| − | |CTM = Morgul |
||
| − | |Row1 = Black Uruk Steel Ingot |
||
| − | |Row1-image = BlackUrukSteel.png |
||
| − | |Row2 = Black Uruk Steel Ingot |
||
| − | |Row2-image = BlackUrukSteel.png |
||
| − | |B1 = Stick|B1-image = Stick.png |
||
| − | |B2 = Stick|B2-image = Stick.png |
||
| − | |B3 = Stick |
||
| − | }} |
||
| − | |[[Black Uruk Steel Ingot|black Uruk steel ingots]] |
||
|{{bar|hearts|10|size=infobox}} |
|{{bar|hearts|10|size=infobox}} |
||
|- |
|- |
||
| + | |{{Recipe|{{PAGENAME}}|gundabad}} |
||
| − | |[[Gundabad Uruk Equipment|Gundabad Uruk bludgeon]] |
||
| − | |{{Grid/Crafting Table |
||
| − | |Output= Gundabad Uruk Equipment |
||
| − | |Output-image = HammerGundabadUruk.png |
||
| − | |CTM = Gundabad |
||
| − | |Row1 = Uruk Steel Ingot |
||
| − | |Row1-image = UrukSteel.png |
||
| − | |Row2 = Uruk Steel Ingot |
||
| − | |Row2-image = UrukSteel.png |
||
| − | |B1 = Bone|B1-image = Bones.gif |
||
| − | |B2 = Bone|B2-image = Bones.gif |
||
| − | |B3 = Bone|B3-image = Bones.gif |
||
| − | }} |
||
| − | |[[Uruk Steel Ingot|Uruk steel ingots]]<br />[[bone]]s |
||
|{{bar|hearts|10|size=infobox}} |
|{{bar|hearts|10|size=infobox}} |
||
|- |
|- |
||
| − | |[[Utumno Equipment|Utumno |
+ | |[[Utumno Equipment|Utumno Warhammer]][[File:HammerUtumno.png|32px]] can not be crafted, but only obtained as a drop from [[Utumno Orc]]s. |
| − | |Can not be crafted, but only obtained as a drop from [[Utumno Orc]]s. |
||
| − | |Can not be crafted. |
||
|{{bar|hearts|10.5|size=infobox}} |
|{{bar|hearts|10.5|size=infobox}} |
||
|- |
|- |
||
| + | |{{Recipe|{{PAGENAME}}|mithril}} |
||
| − | |[[Mithril Equipment|Mithril warhammer]] |
||
| − | |{{Grid/Crafting Table |
||
| − | |Output = Mithril Equipment |
||
| − | |Output-image = HammerMithril.png |
||
| − | |Row1 = Mithril Ingot |
||
| − | |Row1-image = Mithril.png |
||
| − | |B1 = Stick|B1-image = Stick.png |
||
| − | |Row2 = Mithril Ingot |
||
| − | |Row2-image = Mithril.png |
||
| − | |B2 = Stick|B2-image = Stick.png |
||
| − | |B3 = Stick |
||
| − | }} |
||
| − | |[[Mithril Ingot|Mithril ingots]] |
||
|{{bar|hearts|12|size=infobox}} |
|{{bar|hearts|12|size=infobox}} |
||
|} |
|} |
||
== Blacksmith hammer == |
== Blacksmith hammer == |
||
| − | The blacksmith hammer can |
+ | The blacksmith hammer can be obtained by [[trading]] with human or dwarven smiths or as a loot drop from of these NPCs. You can also find the hammers in item frames above Easterling Blacksmiths in villages. |
| − | *[[Gondor Traders#Gondor Blacksmith|Blacksmith |
+ | *[[Gondor Traders#Gondor Blacksmith|Gondor Blacksmith]] |
| − | *[[Rohan Traders#Rohan Blacksmith|Blacksmith |
+ | *[[Rohan Traders#Rohan Blacksmith|Rohan Blacksmith]] |
*[[Blue Mountains Smith]] |
*[[Blue Mountains Smith]] |
||
*[[Dalish Blacksmith]] |
*[[Dalish Blacksmith]] |
||
*[[Dúnedain Blacksmith]] |
*[[Dúnedain Blacksmith]] |
||
*[[Dwarven Smith]] |
*[[Dwarven Smith]] |
||
| − | *[[Easterling Traders|Easterling Blacksmith]] |
+ | *[[Easterling Traders#Easterling Blacksmith|Easterling Blacksmith]] |
| + | *[[Southron Traders#Southron Blacksmith|Southron Blacksmith]] |
||
| − | |||
| − | The aforementioned NPCs can also drop the hammer if they're slain on rare occasions and you can find the hammers in item frames above Easterling Blacksmiths in villages. |
||
== Utumno hammer == |
== Utumno hammer == |
||
| − | The [[Utumno Equipment|Utumno hammer]] is a hammer that can only be obtained by killing creatures in the [[Utumno]] dimension. It is |
+ | The [[Utumno Equipment|Utumno hammer]] is a hammer that can only be obtained by killing creatures in the [[Utumno]] dimension. It is one of the strongest hammers in the game, only behind [[Mithril Equipment|Mithril]]. |
==Fighting with hammers== |
==Fighting with hammers== |
||
| ⚫ | The knockback of hammers makes them usually better than swords. You can knock back enemies before they reach you and you can defend against multiple enemies more easily. Try to fight on the higher position to be able to knock the enemy down so that he gets falling damage. They also have very high damage. |
||
| ⚫ | |||
| ⚫ | The knockback of hammers makes them usually better than swords. You can knock back enemies before they reach you and you can defend against multiple enemies more easily. Try to fight on the higher position to be able to knock the enemy down so that he gets falling damage. They also have |
||
| − | |||
| ⚫ | |||
==Fighting against hammers== |
==Fighting against hammers== |
||
| − | |||
If your enemies have hammers, use ranged weapons or fight with a wall in your back that can stop you from being knocked back. |
If your enemies have hammers, use ranged weapons or fight with a wall in your back that can stop you from being knocked back. |
||
| Line 265: | Line 93: | ||
[[Category:Items]] |
[[Category:Items]] |
||
[[Category:Equipment]] |
[[Category:Equipment]] |
||
| − | [[Category:Dwarves]] |
||
| − | [[Category:Orcs]] |
||
| − | [[Category:Uruk-hai]] |
||
| − | [[Category:Moredain]] |
||
| − | [[Category:Tauredain]] |
||
| − | [[Category:Dunland]] |
||
| − | [[Category:Half-trolls]] |
||
| − | [[Category:Angmar]] |
||
| − | [[Category:Dol Guldur]] |
||
| − | [[Category:Mordor]] |
||
| − | [[Category:Gondor]] |
||
| − | [[Category:Blue Mountains]] |
||
| − | [[Category:Black Uruks]] |
||
| − | [[Category:Gundabad]] |
||
| − | [[Category:Utumno]] |
||
Revision as of 20:59, 14 August 2019
Hammers, also known as warhammers or bludgeons after the names of most hammer types, are a type of weapon. These weapons are sometimes used by NPCs in combat.
Hammers deal 3 more then their equipment set's base damage, have the same durability as their corresponding swords, and will do greater knockback. However, the player cannot block while wielding a hammer. All warhammers (including the blacksmith hammer) have speed of 65%, reach of 100% and knockback of +1.
All the hammers of Public Beta 26 on weapon racks.
Crafting
Most hammers are crafted with three sticks and four ingots. The type of ingot and type of crafting table required depends on the hammer. Usually, these will correspond with the faction that wields the hammer. For example, in the recipes below, a Dwarven warhammer requires Dwarven steel ingots on a Dwarven crafting table, while an Orc warhammer requires Orc steel ingots on a Morgul crafting table. The list in the section below denotes the required ingots and crafting table for each type of hammer.
List of Hammers
Below are listed all the hammers as of Public Beta 33.4. Information is also provided on its attack damage (sorted increasingly), durability (sorted increasingly), on the type of ingot that is required and its respective crafting table. When you compare the hammer to the corresponding sword, you'll notice, that it deals 3 (![]() ) more damage, but the durability is the same as that of the sword:
) more damage, but the durability is the same as that of the sword:
| Hammer Crafting Recipes and Damage | |
|---|---|
| Crafting Recipe | Damage |
Dunlending Crafting
|
4 ( |
|
Morwaith Crafting
|
9 ( |
|
Half-troll Crafting
|
9.5 ( |
|
Taurethrim Crafting
|
9.5 ( |
|
Angmar Crafting
|
9.5 ( |
|
Dol Guldur Crafting
|
9.5 ( |
|
Morgul Crafting
|
9.5 ( |
|
Gondorian Crafting
|
9.5 ( |
| Blacksmith Hammer |
9.5 ( |
|
Uruk Crafting
|
10 ( |
|
Dwarven Crafting
|
10 ( |
|
Blue Mountains Crafting
|
10 ( |
|
Morgul Crafting
|
10 ( |
|
Gundabad Crafting
|
10 ( |
| Utumno Warhammer |
10.5 ( |
|
Crafting
|
12 ( |
Blacksmith hammer
The blacksmith hammer can be obtained by trading with human or dwarven smiths or as a loot drop from of these NPCs. You can also find the hammers in item frames above Easterling Blacksmiths in villages.
- Gondor Blacksmith
- Rohan Blacksmith
- Blue Mountains Smith
- Dalish Blacksmith
- Dúnedain Blacksmith
- Dwarven Smith
- Easterling Blacksmith
- Southron Blacksmith
Utumno hammer
The Utumno hammer is a hammer that can only be obtained by killing creatures in the Utumno dimension. It is one of the strongest hammers in the game, only behind Mithril.
Fighting with hammers
The knockback of hammers makes them usually better than swords. You can knock back enemies before they reach you and you can defend against multiple enemies more easily. Try to fight on the higher position to be able to knock the enemy down so that he gets falling damage. They also have very high damage.
However, the knockback is not good if you fight against ranged troops, because it lets them get away from you so that they can shoot again. Keep another weapon in your hotbar and use that one instead against ranged troops.
Fighting against hammers
If your enemies have hammers, use ranged weapons or fight with a wall in your back that can stop you from being knocked back.
|
Melee:
|