Welcome! This page is to help members of this wiki in creating infobox standard (clear background) images of blocks, structures and NPCs.
There are some prerequisites required, including a graphic editor program (I use Adobe Photoshop, but GIMP is also a good choice). This tutorial does not cover their installation, however you should make some progress if you Google "GIMP/Photoshop download." In addition, if you want to create good-quality images of structures (this also works for blocks) then the mineshot mod is a vital tool.
NPC Images[]
Getting your screenshot[]
The first thing you need to do is build the photobooth. Technically, you don't need one, but if you decide not to use one, good luck with editing away all the background! My preferred method, which allows me to make many, many images very quickly is as follows:
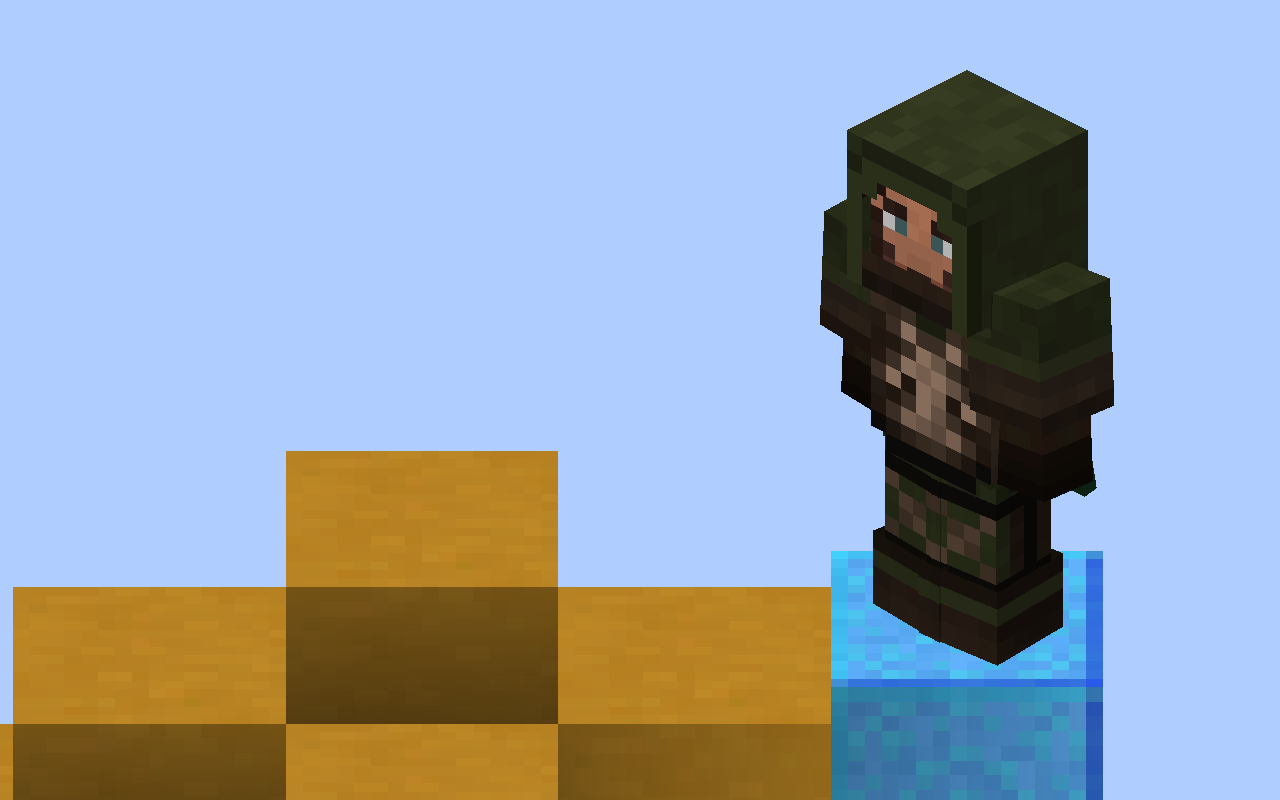
Build a tower, preferably at least 40 blocks high, on level terrain (superflat could be useful here). Then, top the tower with a block that has a pretty plain texture (I use an Edhelmir block, which also helps as it emits light, which means that night mobs such as trolls can be photographed at proper brightness). Floating in the air, at diagonals to the top of the tower, build a structure for you to stand on that is 1 block diagonally away from the pillar. The block you are standing on should be on the same level of elevation as the top block of the pillar. Build a wall behind the standing block after this.
Now, go to your graphics settings and do everything the wiki style guide told you not to. Change your graphics settings to fast, turn the render distance down as far as possible, and turn off clouds and sky. The fast graphics settings gets rid of the shadow, so there's less stuff to edit out. The low render distance removes background noise, as does turning off clouds. Now, spawn your mob, back right into the corner formed by the wall, and go into orthographic mode. Rotate the camera so that the edges of the blocks appear parallel to the edges of the screen. Wait for the mob to look at you, and take the shot. You should end up with something like the screenshot below (your character is invisible in orthographic mode).
Editing[]
Now, It's time to get editing. Use the colour select tool (then delete the selection) (in GIMP), or the magic eraser tool (In Adobe Photoshop) to delete the sky and the block(s). Make sure that there are no hanging pixels remaining, and make sure that you are using the eraser to make the background clear not white (Add Alpha Channel). Finally, crop the image to the edges so that the mob takes up most of the space. You're done! Make sure to save it as a png file to keep the transparent background. The finished product of this tutorial can be seen on the Ranger of Ithilien page.
Armour[]
Armour pages require an isometric view for the infobox. This section will tell you how to properly get it.
Getting your screenshot[]
To take an armour image for the wiki, you will need a resource pack (download) containing an invisible armour stand, in addition to mineshot and an image editor. Before launching minecraft though, edit your mineshot config to take images at 7680x4320 resolution. Once you have completed these requirements, set up your photobooth. It is recommended you fly high into the sky, so that the background is entirely sky and easy to edit out. Once there, you can use /setblock ~ ~ ~ stone to get a block to build off (you can replace the stone with another block that is easier to edit out). Stand on top of that block and face north, then place your armour stand (you should activate the resource pack now if you haven't already). Try to stand as close to the center of the block that the armour stand is on, or alternatively teleport yourself to those coordinates so that you are exactly centered.
Now that you have it all setup, you can get a set of armour, and right click to access the armour stand and place the armour on it. Go ahead and go into mineshot's orthographic mode (default key: numpad 5 with number lock on) and press F1 to toggle your HUD off. Take the screenshot (default key: F9) without zooming (Note: No zooming is done in armour images to provide consistent resolutions, resizing the image can reduce quality.). If you are taking multiple armour images, now would be a good time to swap out the armour and take the next screenshot.
Editing[]
The editing for armour images is nearly identical to that of an NPC image. However, its slightly easier because there are fewer blocks to edit out.
Structures[]
Getting your screenshot[]
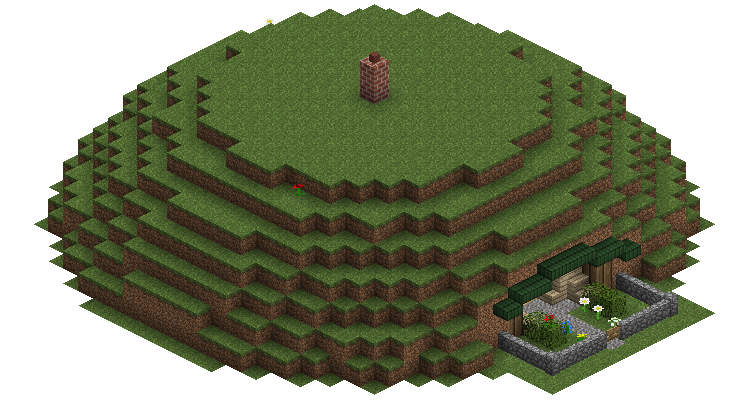
The process of obtaining a screenshot of a structure is rather more difficult than an NPC. While they don't have a tendency to move around like most mobs, they require another mod in order to get proper, isometric renderings for the wiki. The mod required is the Mineshot Mod. Basically, it greatly expands the player's photographic ability, and most importantly for this wiki, allows you to take orthographic (isometric) screenshots. Now, open up a superflat world. If you know how to customise superflat worlds, you might like to change the top layer to sandstone or stained clay (Also, make sure that it uses the 'Plains' biome, to keep the foliage colours consistent). To do this, when creating a superflat world, enter the following into the custom preset box: 2;32x159:4;1; (this creates a superflat world made entirely of yellow stained clay). To enter orthographic mode, press numberpad 5 (if you don't know, or this is inconvenient, you can change it in the options). Depending on the size of the structure, you may have to zoom in or out. You will also need to rotate the camera so that the structure is orientated in the way shown in the example below. Again, the keys for zooming and rotating can be toggled in the options. Then, enter F1 mode, and take the shot by pressing F9. As a side note, make sure no mobs/NPCs are visible, and make sure that the entrance, if present, is visible on the right-hand side.
This mod creates better quality images in a .tga format, which can be opened by most image editors and then converted to a .png file.
Editing[]
Now, we can get back to graphic editing. The principles are much the same as they are for NPCs. The usage of a yellow superflat world means you have a fairly even background, usually removable in a few clicks, sometimes even one. Now, you must crop it right to the edges (see the existing photos for examples) and save it as a png file. You can then scale the image down if necessary, so that it is around 500px wide, and no wider. You're done!
Single Block Renders[]
Setting Up the Dump[]
The easiest way of getting a block render is to use Minecraft's own rendering engine, and then have it save the picture. This can be accomplished by using NEI and the NEI Plugin made by The Ranger Malgevil (This isn't required, but can be helpful if you want to avoid crashes). Start by opening your game using both the Lord of the Rings mod and NEI (and the plugin). Now open your inventory. Click NEI subsets (at the top), and then Mod. Hold shift and click The Lord of the Rings Mod. This will select only the the blocks and items from the Lord of the rings Mod. If you only want to do a specific block, just type in the name of that block in the search bar. When you have all the blocks you want to render in the side bar, go to Options > Tools > Data Dump. Midway down, you'll see an Item Panel row. Click the CSV button until it reads PNG. Then move left and click the button there until it reads 256x256. Then Click the Dump button.
Finding the Dump[]
Navigate to your .minecraft directory (or plain minecraft, on Mac), wherever that may be. In that folder you should see a dumps folder. Inside that folder will be all the images that you dumped. All that needs to be done is to upload the images, remembering the appropriate naming scheme dictated by the Wiki Style Guide. You end up with a page that looks something like Copper Ore.
Drinks[]
Samwise created a script which takes the mod files and generates all the Mod's drink images as well as gifs for each drink.Milk plans to update this script once drinks are added in renewed.
|
LotR Mod & Wiki Help
Mod help:
Mod Installation •
Configuration •
Compatible mods •
Creating a modded server |